Plan Ahead: The Secret to Perfect Scoopable Peanut Brittle Ice Cream
Imagine a scoop of ice cream so exquisitely creamy, studded with crunchy, sweet, and salty shards of peanut brittle, melting slowly on your tongue. Now imagine making it yourself, without an ice cream maker, right in your own kitchen. This isn't a dream; it's the reality of a no-churn peanut brittle ice cream recipe, a dessert so simple yet so utterly delightful, it has become a cherished favorite for many. The magic lies not just in the ingredients, but in a crucial step that many first-time makers might overlook: planning ahead.
While the preparation itself is remarkably straightforward, the secret to achieving that coveted, perfectly scoopable texture lies in patience. We're talking about a 24-hour wait – a small investment of time that yields a tremendous return in flavor and consistency. Let's dive into why this waiting period is essential and how you can create this irresistible frozen treat at home.
Why Patience is Your Key Ingredient for Perfect Scoopability
When it comes to homemade ice cream, especially a no-churn variety featuring ingredients like peanut butter, timing is everything. While you might be tempted to dive in after just a few hours, the true magic of this peanut brittle ice cream recipe unfolds over a full day of freezing.
The unique challenge and charm of this particular recipe stem from a star ingredient: chunky peanut butter. While it contributes immensely to the rich, nutty flavor and luscious texture, the fats and salts within peanut butter actually slow down the freezing process. This isn't a flaw; it's a feature. At around 8 hours, your ice cream will likely be soft, perhaps even a bit yielding, but certainly edible. However, to achieve that ideal, firm-yet-creamy consistency – the kind that curls perfectly onto a spoon or scoop – a full 24 hours in the freezer is required. This extended chilling time allows all the components to fully meld and solidify properly, transforming a good dessert into an exceptional one. Trust the process; the wait is absolutely worth it for a truly scoopable, delightfully smooth peanut brittle ice cream.
Crafting Your No-Churn Peanut Brittle Masterpiece: A Step-by-Step Guide
Making this creamy, crunchy peanut brittle ice cream is surprisingly simple, requiring minimal equipment and no ice cream maker. Follow these steps for a guaranteed delicious outcome.
Gather Your Essential Tools & Ingredients
Before you begin, ensure you have:
- A 9x5-inch metal loaf pan
- Plastic wrap
- A large mixing bowl
- A medium mixing bowl
- A whisk or electric mixer
- Ingredients:
- 2 cups cold heavy cream
- 1 (14 ounce) can sweetened condensed milk
- ¾ cup chunky peanut butter
- 1 teaspoon vanilla extract
- ⅛ teaspoon fine sea salt
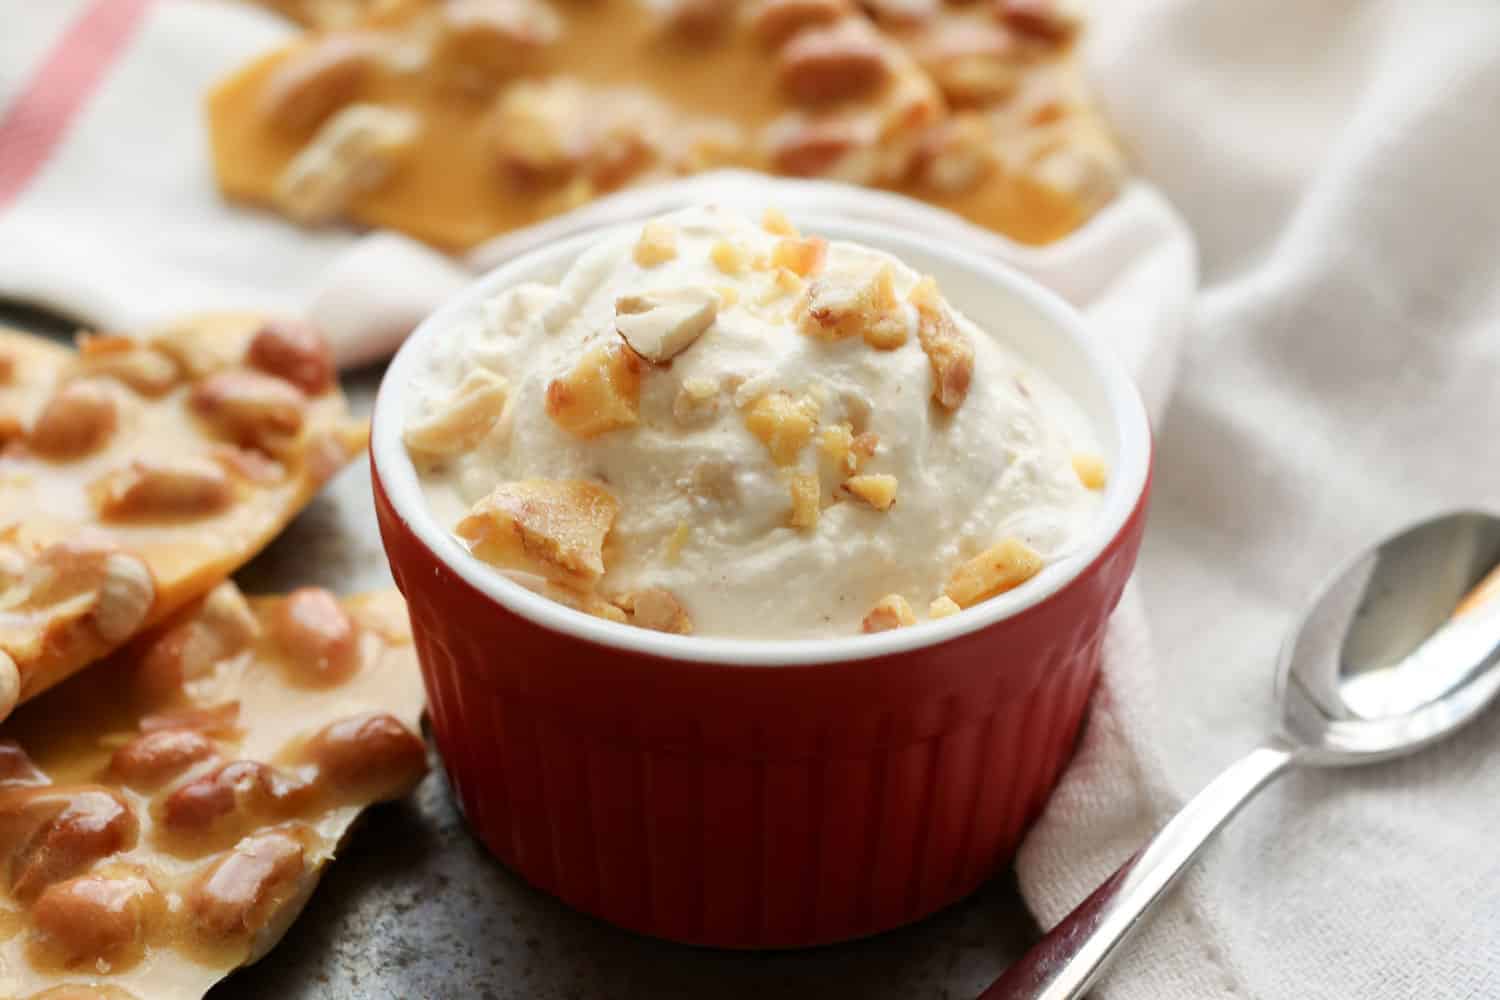
- 4 ounces peanut brittle, crushed
The Preparation: Setting the Stage for Success
- Chill Your Pan: Line your 9x5-inch metal loaf pan with plastic wrap, ensuring enough overhang on the sides to easily lift the frozen ice cream later. Place the lined pan directly into your freezer. Chilling the pan helps the ice cream mixture begin to firm up faster once transferred, contributing to a better final texture.
Whipping the Cream: Building the Base
- Achieve Stiff Peaks: In your large mixing bowl, pour the 2 cups of cold heavy cream. Using an electric mixer (or a whisk and some serious arm power), whip the cream at medium-high speed until stiff peaks form. Stiff peaks mean that when you lift the whisk, the peaks of cream stand firm and hold their shape without drooping. Be careful not to over-whip, which can turn the cream grainy. Set this aside gently.
Mixing the Flavorful Core
- Combine Wet Ingredients: In your medium bowl, stir together the sweetened condensed milk, chunky peanut butter, vanilla extract, and fine sea salt until well combined and smooth. The salt is crucial here; it enhances the sweetness and balances the richness of the peanut butter, bringing out its savory notes.
The Art of Folding: Keeping it Light and Airy
- Lighten the Mixture: Take about one-third of your whipped cream and gently fold it into the peanut butter mixture. This step is called "lightening" and helps to make the denser peanut butter mixture more pliable and easier to incorporate with the rest of the whipped cream without deflating it.
- Incorporate Remaining Cream: Carefully fold in the remaining whipped cream until no streaks of white cream are visible and the mixture is uniformly blended. The key here is gentleness; you want to retain as much air as possible in the whipped cream, which is what gives no-churn ice cream its signature light and airy texture.
Adding the Star Crunch
- Fold in Peanut Brittle: Gently fold in your crushed peanut brittle. If you're struggling to find brittle, check drugstores like CVS or Walgreens; they often carry it. To crush it, place the brittle in a heavy-duty zip-top plastic bag and use a mallet or rolling pin. Aim for a mix of fine crumbs and small shards for varied texture. For more expert tips on making a superior no-churn dessert, check out Master No-Churn Peanut Brittle Ice Cream: Easy Recipe & Tips.
The Final Freeze: Patience Rewarded
- Freeze and Wait: Spoon the glorious mixture into your chilled loaf pan. Place it uncovered in the freezer for the full 24 hours. Freezing uncovered initially helps to prevent ice crystals from forming on the surface. After 24 hours, you can serve it immediately or cover it tightly with aluminum foil or an airtight lid for storage. It will keep well in the freezer for up to 2 weeks.
Ingredient Spotlight: Why Each Component Matters
Every ingredient in this
peanut brittle ice cream recipe plays a vital role in achieving its irresistible flavor and texture. Understanding their contributions helps appreciate the simplicity and genius of the no-churn method.
- Heavy Cream: This is the foundation of your no-churn ice cream. When whipped, it incorporates air, creating a light, fluffy base that mimics the churning process of a traditional ice cream maker. Its high fat content also contributes to the incredible richness and smooth mouthfeel.
- Sweetened Condensed Milk: The magic behind no-churn! This provides all the necessary sweetness and a creamy, emulsified base without requiring extra sugar or eggs. It's thick consistency also helps prevent ice crystals from forming, ensuring a smoother texture.
- Chunky Peanut Butter: The star flavor and textural component. It imparts a deep, nutty richness and an appealing saltiness that perfectly complements the sweet brittle. As discussed, its fat content is also responsible for the slower freezing time, which ultimately leads to a denser, more luxurious scoop. Don't skimp on quality here; a good peanut butter makes all the difference.
- Vanilla Extract: A classic flavor enhancer, vanilla rounds out the sweet and nutty profiles, adding a touch of warmth and complexity.
- Fine Sea Salt: A tiny pinch of salt elevates all the other flavors. It balances the sweetness, amplifies the peanut notes, and prevents the ice cream from tasting one-dimensional. This sweet-and-salty dynamic is key to its addictive quality.
- Crushed Peanut Brittle: The absolute showstopper! It introduces a delightful, contrasting crunch and bursts of caramelized sugar and roasted peanut flavor throughout the creamy base. The textural interplay between the smooth ice cream and the brittle shards is what makes this dessert so unique and memorable.
Elevating Your Experience: Tips, Variations, and Beyond
While the classic
peanut brittle ice cream recipe is a masterpiece on its own, there are always ways to personalize and enhance your creation.
The Unexpected Cinnamon Twist
One of the most surprising and delightful additions to peanut brittle ice cream is a subtle hint of cinnamon. As one enthusiast discovered, "The tiny sprinkling of cinnamon adds an unexpected depth to this ice cream without a strong cinnamon flavor, so don’t even think of skipping it." Just a quarter teaspoon of ground cinnamon folded into the wet ingredients (sweetened condensed milk, peanut butter, vanilla, and salt) can transform the flavor profile, adding a warm, almost chai-like undertone that elevates the entire experience without overpowering the peanut brittle. This is a game-changer for those looking to add an extra layer of complexity to their frozen treat. Explore this enticing variation further with
Unlock Delicious Peanut Brittle Ice Cream: No-Churn & Cinnamon Twist.
Sourcing Your Brittle
If you're having trouble locating peanut brittle at your regular supermarket, don't despair! As mentioned in our reference, drugstores like CVS or Walgreens often carry a surprising array of candies, including peanut brittle, especially around holiday seasons. Alternatively, if you're feeling adventurous and want ultimate control over the texture and flavor, making your own peanut brittle from scratch is a rewarding endeavor, though it adds an extra step to your dessert prep.
Serving Suggestions & Storage
Once your ice cream has achieved that perfect scoopable consistency, the possibilities are endless. Serve it simply in a bowl or a sugar cone, allowing the rich flavors to shine. For a more decadent dessert, pair a scoop with warm brownies, a slice of apple pie, or even a drizzle of hot fudge.
When it comes to storage, after its initial 24-hour freeze, ensure your ice cream is covered tightly with aluminum foil or transferred to an airtight container. This protects it from freezer burn and helps maintain its creamy texture for up to two weeks. While it might last longer, the fresh texture and vibrant flavors are best enjoyed sooner rather than later.
This
peanut brittle ice cream recipe has a legendary status, with some home cooks swearing by it for years, making it every couple of weeks. Its addictive quality is a testament to its perfect balance of sweet, salty, creamy, and crunchy.
Conclusion
Creating your own perfectly scoopable peanut brittle ice cream is a rewarding journey that proves great things come to those who wait. This no-churn recipe simplifies the process without compromising on flavor or texture, delivering a homemade frozen treat that rivals any store-bought gourmet version. By understanding the role of each ingredient, particularly the patient 24-hour freeze time, you unlock the full potential of this delightful dessert. So, plan ahead, whip up a batch, and prepare to indulge in the creamy, crunchy, sweet-and-salty perfection that is homemade peanut brittle ice cream. Your taste buds (and your family and friends) will thank you.